Hello! We’ve noticed that you haven’t made any recent edits on your wiki this year. This is a notice that your wiki is eligible for removal. Click here to learn more about the criteria for wiki removal.
Stacks and Fleets move and battle across land regions, sea zones and navigable river regions. Tooltips indicate the different characteristics of each region and sea zone. Terrain type and weather are also displayed at the top of the minimap. Note that sections of navigable rivers may be moved into by ships or by ground troops using riverine movement.<br />Note: Regions are further grouped into States and States into Departments (also called Theaters). State and Department borders can be displayed on the map using the appropriate filters (see below).
Stacks and Fleets move and battle across land regions, sea zones and navigable river regions. Tooltips indicate the different characteristics of each region and sea zone. Terrain type and weather are also displayed at the top of the minimap. Note that sections of navigable rivers may be moved into by ships or by ground troops using riverine movement.<br />Note: Regions are further grouped into States and States into Departments (also called Theaters). State and Department borders can be displayed on the map using the appropriate filters (see below).
−
===CivilizationLevel===
+
===CIVILIZATION LEVEL===
The different Civilization Levels are:
The different Civilization Levels are:
*Wild
*Wild
Line 140:
Line 140:
Depending on the Civilization Level (and other factors), unsupplied troops in an enemy region have very limited ability to live off the land each turn (see chapter).
Depending on the Civilization Level (and other factors), unsupplied troops in an enemy region have very limited ability to live off the land each turn (see chapter).
+
===TRANSPORT NETWORK===
+
+
*None
+
+
*Tracks
+
+
*Roads
+
+
*Railways
+
+
Units moving into regions with tracks will never pay more than 150% of the clear terrain cost, whatever the terrain type.<br />Units moving into regions with roads or rails won’t pay more than the clear terrain cost, whatever the real terrain type.<br />Units moving by train will only spend one day for each region traveled.
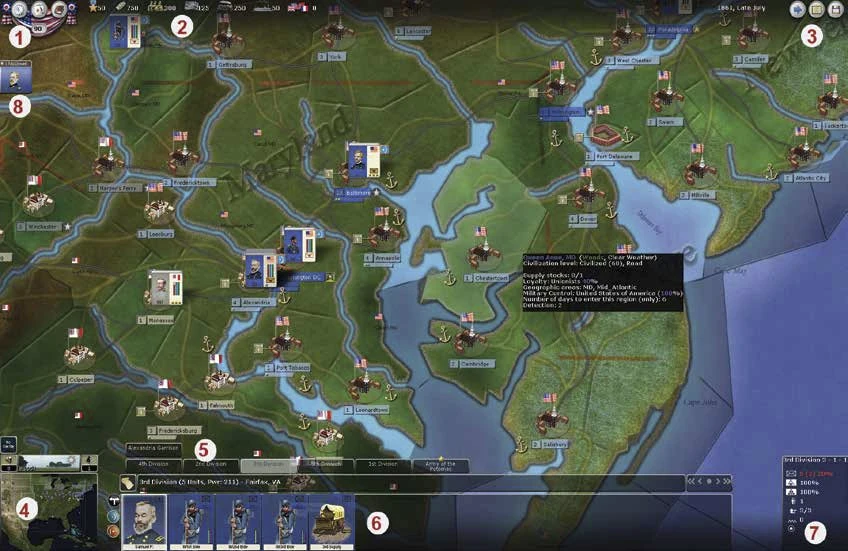
1. Active Side, Main Functions (Production, Decisions, Strategic Atlas) and National Morale
National Morale is the main indicator of your success. The three round buttons give you to the respective important game functions of Production, Decisions and Strategic Atlas. Check the tooltips for additional details.
2. Available Assets and Foreign Entry Level
Key assets such as Victory Points, Money, Conscripts, War Supplies, Rail and River transport capacity that are currently available, as well as the Foreign Entry Level.
3. Current Date & Main Commands
The current date is displayed here.The three icons to the right of the current date allow you to start the Resolution Phase (End turn), to reach the Main Menu or to Save the game respectively.
4. Filters, Region Terrain and Minimap
The different Map Filters (see chapter) can be accessed from here. You also see information on the currently selected land, sea or navigable river region (terrain and supply). The minimap shows the whole geographic scope of the war with your troop dispositions and allows you to jump to any location by clicking on it.
5. Stack Panel Tabs for Stacks in Region
Each tab represents a Stack in the currently selected region.
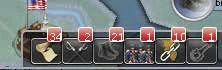
6. Stack Panel and Unit Counters
The lower part of the Stack Panel displays the Units present in the currently selected Stack (see chapter). When no Stack is selected, the panel is removed from view to show more of the map. You can use the buttons located at the left-hand side of the panel to change the posture and engagement orders (a.k.a. postures) of the selected Stack, and the Special Orders (crossed rifles, tent, and hammer) buttons to issue specialized commands.
7. Inspection Panel
The small panel on the bottom right shows the main information about the currently selected Stack. If you click on a specific Unit counter in the Stack Panel, the Inspection Panel will slightly change to show the selected Unit’s component elements. By further clicking on these element icons, you will access the element details window which provides extensive details regarding that element (see chapter). Reviewing this information is not necessary to play the game, but can sometimes provide advantages in organizing and using your forces.
8. Army Outliner
This small square counter located on the upper-left hand side of the screen is a convenient shortcut to one of your armies on the map (there might be as many squares as you have armies on the map). Little diamond symbols in the army outliner represent the number of Corps under the Army command chain.
9. Sea Lanes Box (not shown on the screen capture)
This box, located near the East Coast, represents Union merchant shipping.
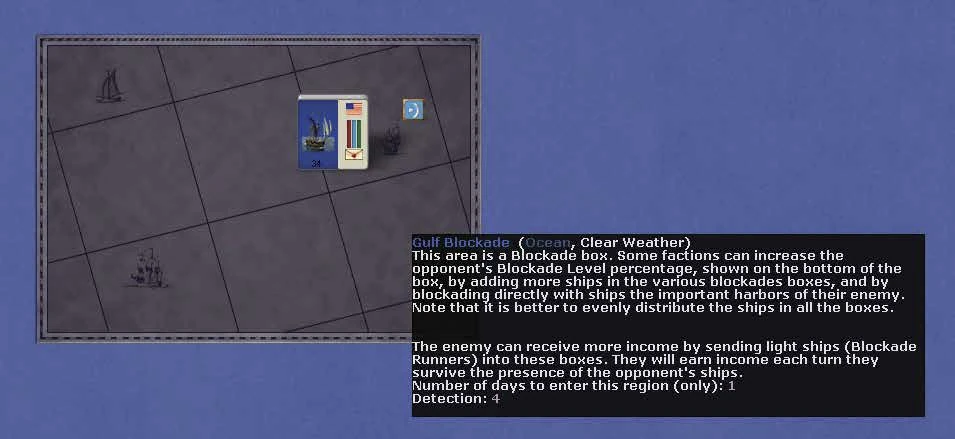
Atlantic and Gulf of Mexico Blockade Boxes
These boxes, located respectively next to the Sea Lanes box and in the Sea south
of Louisiana, represent CSA trade routes which the Union will seek to blockade.
10. Offmap Boxes
They are located all around the main map and usually connected with it via
“Transition Link” (a way to
reach one box from another or from the map, and vice
versa).
Message Panel
This panel can be accessed by clicking on the Message Bar buttons that show at
the bottom right of the screen when no Stack is selected. The six buttons allow you
to filter the messages by categories (check the tooltip for details). You can always
return to the Message Log message list by right clicking anywhere on the map. Red
messages are events of particular importance. Click on the icon to the left of the
messages to center the map on the region corresponding to the message or open
details for a red message. For notable events, special message icons appear along
the lower right side of the screen which disappears as you select them.
The message log
The Strategic atlas
Many of the game functions are accessed from here. Click on the book-button (the
Many critical game functions are accessed through the Strategic Atlas, such as recruitment and economic decisions (F1 to F10 shortcut keys).
right button in the top left corner of the screen) and you will open a new window. Click on the thumbnails (or use shortcut keys F1 to F10) to cycle between the different screens (see Managing Your Nation chapter for details).
NAVIGATING THE MAP
To scroll through the map, simply place and hold the pointer on the edge of the screen, or hold the left button and drag the mouse, or use the arrow keys. To zoom in or out of the map, either use the mouse wheel or the End, Page Up, and Page Down keys. You can also press the mouse wheel button to swap between highest and lowest zoom level.
REGIONS & SEA ZONES - TERRAIN & STRUCTURES
Stacks and Fleets move and battle across land regions, sea zones and navigable river regions. Tooltips indicate the different characteristics of each region and sea zone. Terrain type and weather are also displayed at the top of the minimap. Note that sections of navigable rivers may be moved into by ships or by ground troops using riverine movement. Note: Regions are further grouped into States and States into Departments (also called Theaters). State and Department borders can be displayed on the map using the appropriate filters (see below).
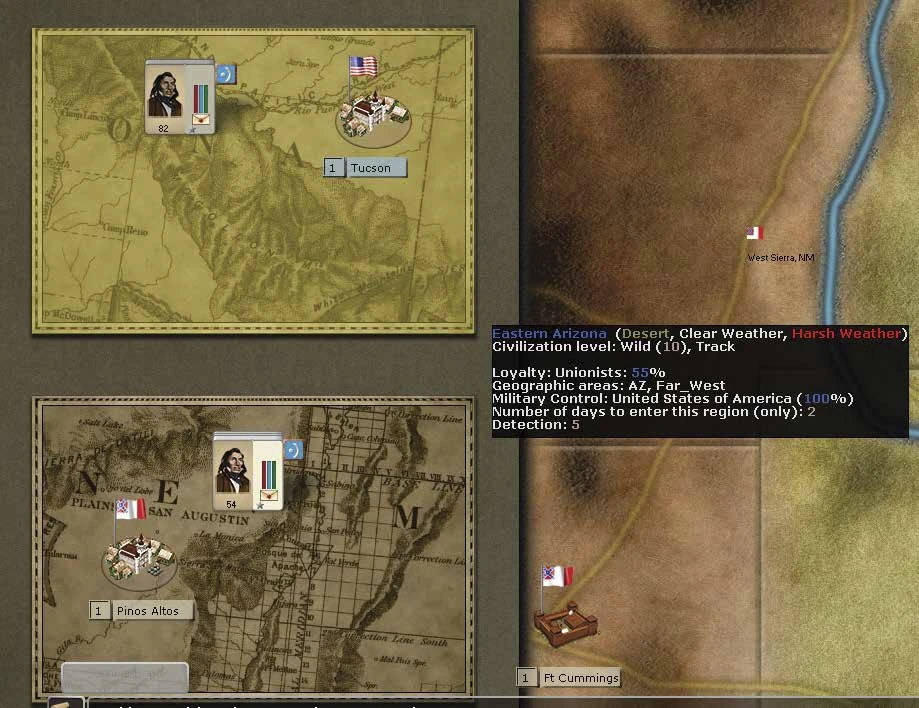
CIVILIZATION LEVEL
The different Civilization Levels are:
Wild
Cleared
Civilized
Rich
Depending on the Civilization Level (and other factors), unsupplied troops in an enemy region have very limited ability to live off the land each turn (see chapter).
TRANSPORT NETWORK
None
Tracks
Roads
Railways
Units moving into regions with tracks will never pay more than 150% of the clear terrain cost, whatever the terrain type. Units moving into regions with roads or rails won’t pay more than the clear terrain cost, whatever the real terrain type. Units moving by train will only spend one day for each region traveled.


